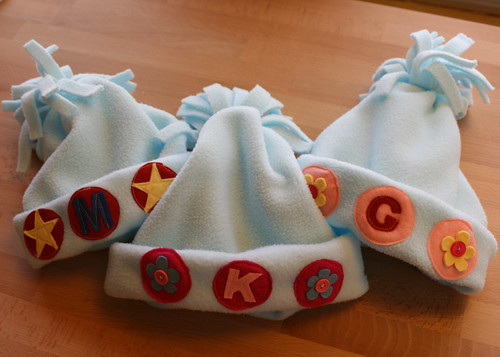
Here's a fleece hat that can be made in 15 minutes. Really! So if you are
 still in need of a quick gift, here's a project for you. It's not original with me. I saw a couple of other versions out there on the internets, but I combined several features for my own version and I thought I'd post it.
1. Cut a piece of fleece into a rectangle 16 inches high by 20 inches wide (shown in photo folded in half along left side). I was making my hat for a small child, and I wanted a final circumference of about 19 inches so a 20-inch width left room for a 1/2-inch seam allowance. You want to make sure that the circumference (i.e. bottom dimension in this picture) is aligned with the stretchy side of the fleece. You can use this guide from Martha Stewart to determine the width.

Average Head Circumference:
Newborn (6 months and younger) 14 to 17 inches
Infant (6 to 12 months) 16 to 19 inches
Child (12 months to 3 years) 18 to 20 inches
Child (3 years and older) 20 to 22 inches
Adult Woman 21 to 23 1/2 inches
2. Along the top edge, cut a fringe about 3 inches long. I just used the length of my scissors and snipped in about every 1/2 inch all along the top. Along the right (cut) edge, measure up 5 inches from the bottom and make a 1/2 snip.3. Sew the 1/2 inch seam from the bottom of the fringe all the way down to the snip you made in the side. You can be a sloppy sewist because fleece is incredibly forgiving and your stitches are going to disappear down into the seams.
4. Turn the hat right-side out (it was inside-out when we started) and sew from
 the 5-inch snip to the bottom of the hat. Fold the bottom of the hat up twice, and this area becomes the hat band.
5. Take a scrap of fleece about 8-10 inches long by 1/2 inch and tie it around the hat just under the fringe. Make a nice tight knot, and then cut off the "tails" of the tie so that they are the same length of the rest of the fringe.
You're done. Seriously. 15 minutes or less.
Of course, if you're me, you now spend an hour or more embellishing each hat with personalized felt initials and flowers and stars. I find it helpful to
 use Word Art in Microsoft word to draft simple shapes in the sizes I want and then use these as patterns for cutting out the felt. The Wise and Bearded One taught me this trick when we made the Super Hero Capes last year.
I'm pleased with the end results, and I'd definitely make similar hats again. I think they'd make a great birthday present for a winter birthday. In a solid grey, black or brown I even think a grown man would wear them....maybe with a shorter fringe on top. I'd love to recycle worn fleece jackets into hats. And we certainly have plenty of fleece jackets here in the Pacific Northwest.


5 comments:
Sooo cute!!
Yes. Extreme. Ly. Cute.
Those are adorable!
I still love your superhero capes. I made a superhero t-shirt for my nephew this year, using your freezer paper technique--soooooo much fun!!!! I'll post soon.
Whoops! That was me. Uncle Phil was logged in, and I didn't notice it until too late. I'm quite sure he doesn't sew or do freezer paper stencils.
Thanks for the compliments!
Post a Comment