Showing posts with label sewing. Show all posts

29 February 2012

Made: Faux Fur Vest (Fail)


It's no secret that I'm in love with Figgy's Patterns.  When I ordered my Sunki dress pattern before Christmas break, Shelly was kind enough to throw in a freebie--this lovely Lux vest pattern. It's normally $8 on her website to download as a PDF.  

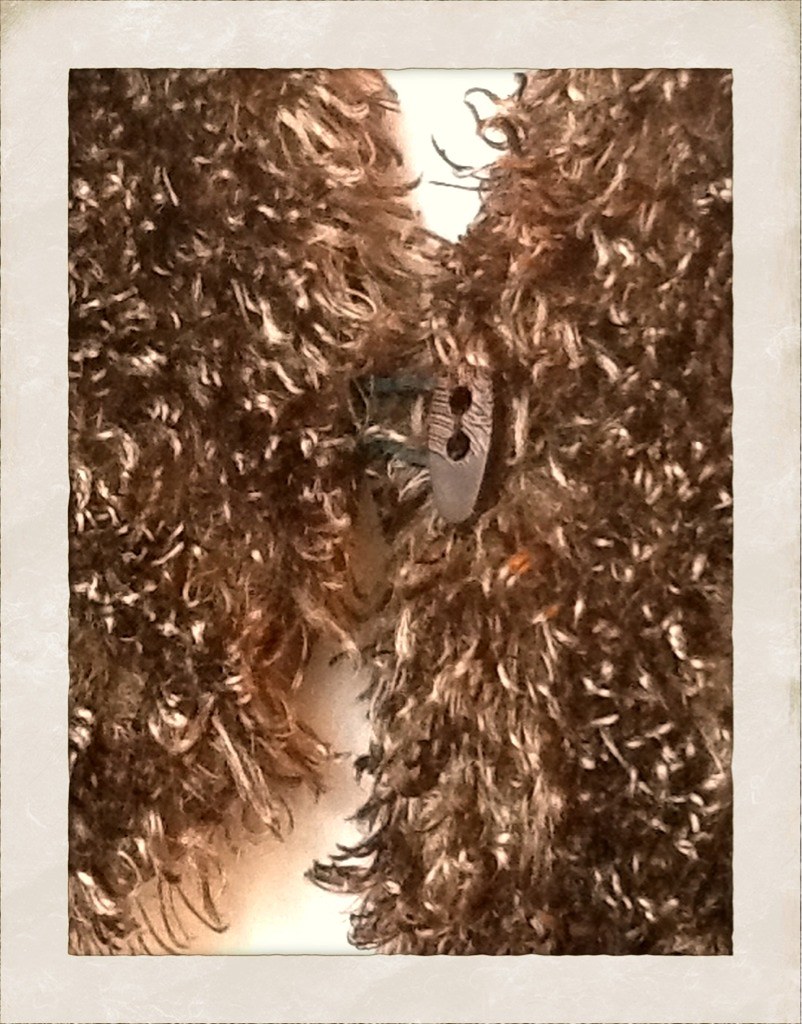
I loved the faux fur vest trend this winter, and I promptly went to Joann's and bought some cheap Minky-type fur to make a "practice" vest.  The Figgy's pattern is super easy and has some clever construction tricks that make it go very quickly.  If I didn't have to vacuum up faux fur bits several times during the process, this could easily have been a one-hour project.


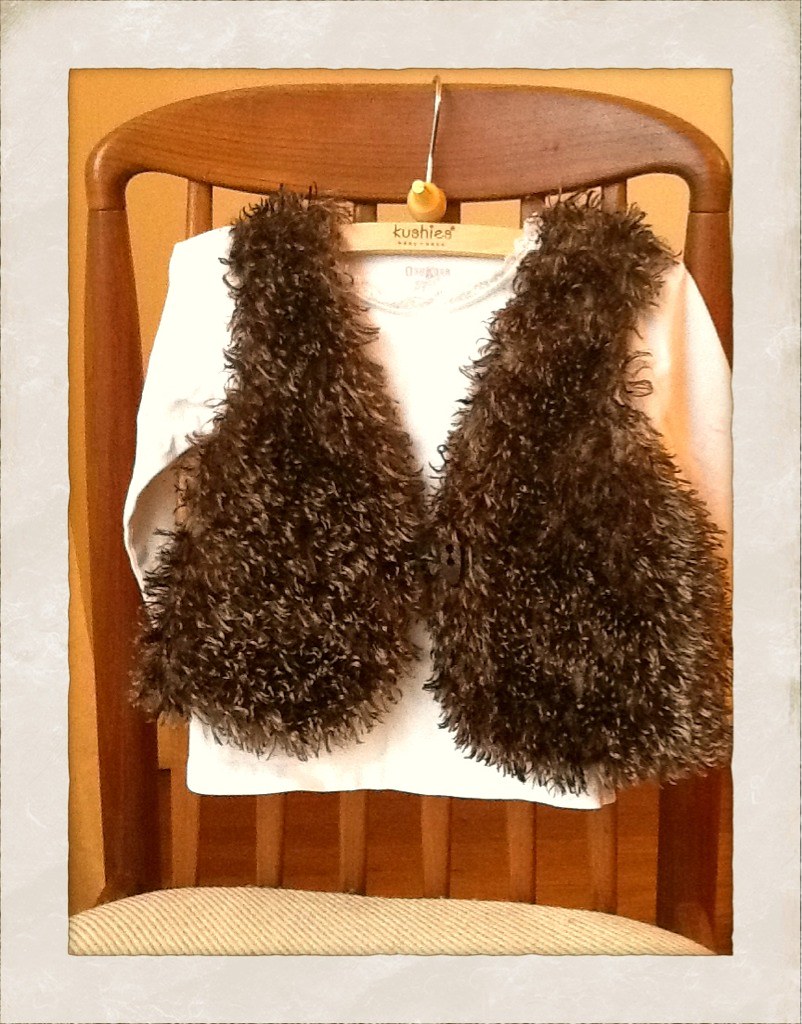
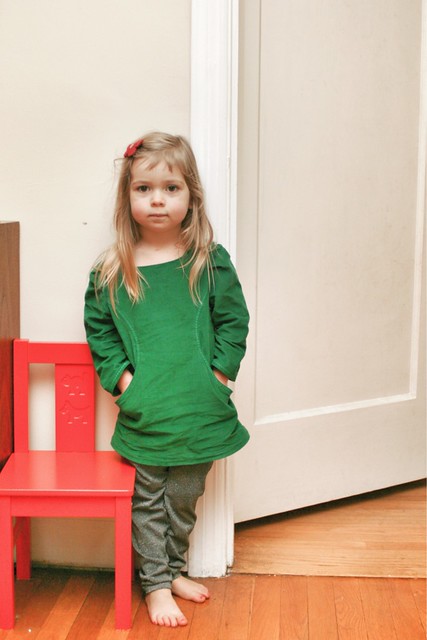
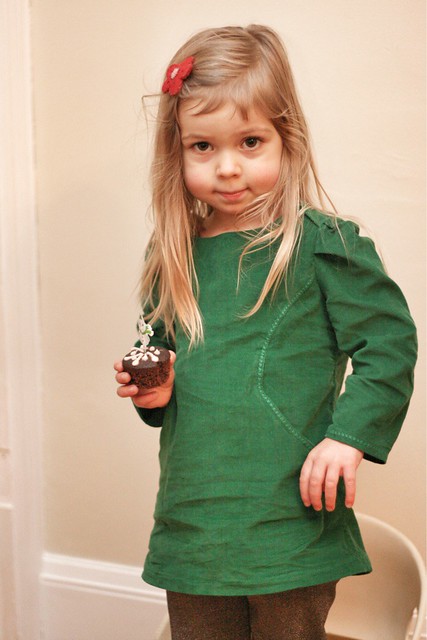
I made two of these little "practice" vests (gave one to the Little Housemate) and fully intended to go to Fabric Depot and buy fancy faux fur like the sample vest in the picture at the top of this post.  However, my darling two-almost-three year old had other ideas.

She simply refuses to wear it.  She'll touch it.  She says, "oh that's nice and fuzzy." But when I try to put it on her, her face goes flat, her stubborn lower lip pops out and there is no cajoling her into wearing it.  For two whole months I have had it hanging in her room with intermittent attempts to persuade her to wear it.  For two whole months she has flatly refused.

And so I'm forced to rank this as a "fail".  Through no fault of the pattern, nor the sewist (for once), but because my attempts to clothe my child in hand-crafted goodness has been thwarted.

Perhaps I'll just make an adult-sized vest for me.


09 January 2012

Made: Christmas Gifts

I made a few handmade gifts this Christmas, and I thought I'd share now that the giving has been accomplished. In the rush to get gifts shipped, I didn't snap many pictures so some of these photos are from my inspiration sites.

Photo from H is for Handmade
--Infinity Scarves:
When I saw this photo on Pinterest and read H is for Handmade's tutorial, I knew I had to make a few infinity scarves for my sister-in-laws and nieces. They were dead easy, and I really like how they turned out when made with soft flannels. I need to make a few more to keep. A scarf is a great way for me to layer at work as I move between schools with a variety of heating issues.
Photo from Saltwater Kids

--Indoor Camping Kit
Girls are easy to make gifts for but often my little nephews get less in the homemade gift category.  This year I was determined that at least a few of them would get a homemade gift.  I was inspired by Saltwater Kids fort kit, but took a few liberties to design my own Indoor Camping Kit using a bag we had laying around the house, some cheap IKEA sheets and a bunch of supplies from the hardware store and the dollar store.  The Wise and Bearded One even designed a logo for the bag.  I hope they are having fun with it because I had fun making it.

IMG_2843


--Sparkly Play Dough:
Play Dough has become my go-to gift for the under-5 set.  It's easy to make, the Sprout can help a little, and I'm always pleased with the results.  This time around we used two packs of Kool-Aid in each batch for color and scent, and at the end we added glitter to make the Play Dough extra Christmas-y.


made: laundry soap

--Laundry Soap
Over the holidays I renewed our homemade laundry soap supply.  I decided to share some of it with a few family members that I thought are pragmatic enough not to scoff at a Christmas gift of laundry soap :)  My basic recipe is here although lately I've been using Dr. Bronner's Peppermint Castille Soap and no essential oils since there is already peppermint in the soap.

IMG_2919

--A back quiver and arm guard
Last, but not least, is this odd little gift that didn't get finished until after Christmas.  My sister let me know that my nephew was getting a bow and arrows for Christmas and would really like a back quiver and an arm guard.  I, honestly, had no idea what I was doing but a little Googling is a dangerous thing.  I found an army green purse at Goodwill that I demolished for parts.  I handstitched all the faux-leather pieces because I was afraid to put them through my machine.  I even had enough left over for a matching wallet.  I have no idea if this quiver and arm guard actually work....I fear the quiver may be too short.  Next time I think I'll just order him something from Cabella's :)


01 January 2012

Made: Sunki Dress


I fell in love with the Sunki dress pattern as soon as Figgy's released it this fall. I prefer simple, clean-lined clothing, and this little dress is all that and more. I love the way the side panels swoop down into the pockets. And I adore the ikat fabric from the sample above so much that I tracked it down and bought the rest of the bolt for some future awesome project (yet to be determined).

1

I made my "trial" Sunki out of a soft green corduroy from Bolt. I originally had some contrasting fabric for the side panels but I chose not to use it at the last minute. The pockets were the trickiest part of the dress to sew but the directions are clearly written and the diagrams were helpful. I ended up pinning the whole panel together before I sewed a stitch just to make sure I had everything lined up correctly.

2


I made the 2-3 size and it fits my tall two year old perfectly through the shoulders. It's a tad short in length so I will make the next one a size up. If I am going to sew clothes for the Sprout, I want her to be able to wear them for more than a few months. She is aptly nicknamed since she seems to sprout up when I'm not looking and suddenly need longer pants or bigger shoes.

3

Since I didn't use a contrasting side panel, I highlighted the side panel seam with the asterisk-looking fancy stitch on my Janome. I finished off the cuffs of the sleeves with the same stitch. I am really happy with the results. I can't wait to make another one with a more adventurous fabric choice.

I also bought some knit to make the leggings that come with the pattern. The Sprout and I do love a dress with leggings. It's a combination that works much of the year here in the Pacific Northwest. I'm thinking this little dress and leggings lends itself to be made in multiples so you can be sure you'll be seeing more of the Sunki around here.

23 November 2011

Pre-Thanksgiving Day

Well, I didn't get to any of the things I wanted to this weekend.  I was battling a cold toward the end of the week and on Saturday and Sunday, the cold was winning.  I went to the doctor.  She confirmed it was just a really bad cold (on top of the vestiges of an earlier cold) and told me to go home and rest.  So I did. 

"Resting" is interpreted in my world to mean surfing the internet from the couch for hours on end.  Here's some things I've been crushing on.  Hard.

----------

Figgy's

Once upon a time, I did some pattern testing for Patterns by Figgy's.  I even met the designer, Shelly Figuroa, in the park for a play date once, and I can attest that she is a genuinely-kind Midwestern woman transplanted to the Pacific Northwest and that her patterns are have great directions that even a beginning sewist could figure out. 

I also took a Japanese sewing class at Modern Domestic with Daniela Crane, and I know she is a talented designer and has a great eye for uniquely-modern clothing.

Figgy's is Shelly and Daniella's new collaboration of patterns. I am madly in love with this little jacket out of Pendleton wool and the dress and legging pattern. 

So many sewing patterns seem boring, uninspired or old-fashioned.  These look modern and clean to my eye.  I know part of it is the fabric selection and styling, but I am madly, madly in love with them.  Did I say that already?!

----------

Schoolhouse Electric & Supply Co. 

We have Schoolhouse Electric light fixtures in our kitchen, and I have loved their classic, utilitarian products and showroom ever since we arrived in Portland.  I heard the rumblings on the internet that they were extending their line to products for the whole house, and this week the catalog came in the mail.

Ah. May. Zing.  I want whoever styled those photos to come live in my house.  Right now.  They seem to have found that perfect mix of spare utilitarian objects mixed with warm woods and textiles that somehow reads vintage and modern simultaneously.

And it makes me all wanty inside.  You can see their catalog here. 

----------

I am quite committed to no Christmas before Thanksgiving.  But the Friday AFTER Thanksgiving is the perfect day to spend crafting homemade gifts.  In fact, I host "Craft Friday" every year on "black" Friday.  If you're a Portlander and would like to come hang out with other women and get your craft on, please leave a comment below and I'll email you my contact info. 

Today is the day to gather supplies.  If you're looking for ideas here are some DIY gifts that I've made in other years:

Quick and Easy:
Photo Magnets
Felt Barrettes

Slightly More Complicated:
Doll Maker's Kit
Freezer Paper Printed Jersey Scarves
Fizzy Bath Bombs
Natural Lip Balm
Basic Bath Salts
Freezer Paper Printed T Shirts


What are you making this year? I'm still gathering supplies and ideas for gifts this year.  I'd love to hear what you're up to.


19 October 2011

Made: End-Of-Summer Bag

(image sources linked via Pinterest)

This summer I was loving some tote bags I saw on the internet that appeared to be made out of rag rugs.  Now I'm far too cheap to buy something that I think I can DIY myself so I bought a small cotton rug at IKEA (remember this haul?)  and built my own bag.  Of course, by the time I made it, it was the end of summer and so it only got to go on one trip to the beach and a week or two of going to work with me before it got replaced by my cold weather tote bag (made by my MIL).  But I imagine it will survive many future trips to the coast and the pool in the coming summers.

IMG_1546

IMG_1548

One IKEA cotton rug
Two yards cotton webbing
Denim scraps for binding and inner pocket

 Now I'm inspired to try to replicate a bag like one of these for fall:

(once again, image sources linked via Pinterest)


28 April 2011

Got 'em!

IMG_9767_edited-1 by ndmiller
IMG_9767_edited-1, a photo by ndmiller on Flickr.

I made it to Joann's this weekend and scored my $1.99 Simplicity patterns. You'd think that 4 patterns at $1.99 would lead to a roughly $8.00 tab at the check-out. Not so. Not so. Because I had to check out the Lisette fabrics too and of course the D. S. Quilts fabrics. Even with my 40% off coupon my tab was....well, let's just say a lot more than $8.00.

It's tough week over here. As everyone knows by now, funding for education is in huge crisis. This week it's hitting the teachers in my district particularly hard as we prepare to close a school for next year and two more schools the following year. While my own job appears to be safe for the time being, I am surrounded by teachers who are really unhappy to have to change schools, classrooms, or positions for next school year. A few will lose their jobs or be reduced to part time. It is heavy.


IMG_9763

This would also be the week the Sprout has decided to wake up screaming bloody murder in the middle of the night for no apparent reason. I swim my way up through the layers of deepest sleep, pad over to her crib, find her pacifier, and attempt to comfort her. Sometimes she is so distraught that we end up going downstairs and getting a drink or walking about a bit. Usually by the time she is calmed down and falling back to sleep I have just gained maximum alertness and then I have trouble getting back to sleep.

The combination of emotional and physical weariness means I'm laying low this week in the blogging world and in the crafting world.

"All will be well and all will be well and all manner of all will be well" as my friend Cris reminded me of the words of Julian of Norwich this week.

-------

On a happier note, Susan and Daniela shipped their first 30 quilts to Japan this week as part of the Quilts for Quake Survivors' project. I couldn't be prouder of all the sewists and quilters who've risen up to contribute to this project.

20 April 2011

A Reason to go to Jo-Ann Fabrics??


I have enjoyed sewing the Oliver + S patterns and fabric so much for the Sprout that I nearly shrieked when I found out that Liesl has also designed a set of adult size patterns for Simplicity. You can see the whole pattern collection over on the Lisette blog. I'm particularly partial to this Passport dress and jacket because I think it could easily be work-appropriate for me. I'm also really like the Traveler's Dress that looks like a classic shirtwaist dress with some body-friendly variations.

From the Lisette blog I learned that Liesl is also working with Jo-Ann's to come out with a fabric line. It looks like a great mix of heavier weight canvases and twills and lighter poplins and apparel cottons. And the colors are bright and cheerful and not some sort of dreadful floral print like most Jo-Ann apparel fabrics have tended to be. They seem to be either a dreadful print or made out of the cheapest of polyester blends that I want nowhere near my body.

And to top off the great news, I just saw that the Goddess of Modern Quilting herself, Denyse Schmidt, has put out a line of quilting fabrics at Jo-Ann's. The flickr fan groups are abuzz. You can see some fabric swatches here.

So despite my long disdain for big-box craft stores, I'm afraid I'm digging through my trash to find this month's 40% off coupon to Jo-Anns so I can venture forth some evening this week. I hope the superfans haven't snatched up all the good stuff already.
_______

I just found my JoAnn's flyer for this week and it looks like Lisette fabrics are 50% off this weekend and Simplicity patterns are $1.99 (at least at my local Portland Jo-Anns). So....off to the big-box store I go.

19 April 2011

Made: Oliver + S Hopscotch Dress v. 2.0, 3.0 and 4.0

After the first version of this Oliver + S dress, I made a few small changes. First I moved up to the 3T and decided to only minimally hem the sleeves and skirt so there's plenty of height for my tall girl to grow into. I decided to line the entire bodice with iron-on interfacing to keep it from stretching out all funky like the first one. This worked great and the interfacing I used is soft enough to still let the neck opening flex enough for my girl to get dressed without distress.

I copied out a simple legging pattern from a Japanese children's clothing book. I was able to cut both the dress and leggings out of 1 yard of fabric. (Yay! I love minimal-waste sewing.)

IMG_9732

Then I went to a Friday Night Sew-cial at Modern Domestic and cranked out versions 3 and 4 in less than three hours. I love having sewed the same pattern enough times that it comes together quickly and easily. I love being able to use MD's serger even more. Ah, bliss! The serger whips out knit garments so quickly! I serged the hems too so they're neatly finished but extra long for my quickly-growing Sprout.

IMG_9731

Here's the Sprout's spring wardrobe--4 dresses, 3 pairs of leggings, a green polka dot t-shirt and some soft green corduroy pants. I have green polka dot knit fabric too but when I dug into the box of 3T hand-me-downs I found this polka dot shirt and pants already made. Now I'm thinking that I'll use the green fabric to make a little jacket to round out the collection. Perhaps it's time for another Little Woo.

IMG_9729

Like I mentioned earlier, the Sprout is not a cooperative model these days. Here's the best photo I could get of her. Zoned out, watching cartoons, with her hand up her shirt. Yup, she plays with her belly button or her chest pretty much constantly. We're hoping that if we ignore it, she'll quit doing it on her own before she hits adolescence.

IMG_9715

18 April 2011

Made: Oliver + S Hopscotch Dress, version 1.0

IMG_8909_edited-1

Along with my fabric haul (aka "Christmas present") I finally bought one of the Oliver + S patterns. I've been drooling over these patterns ever since Liesl Gibson first published them. I'm a total sucker for the paper dolls on the covers, and I saw so many great garments that other sewists have been making from this line. The patterns run about $16 in the local shops which I find hard to swallow when there are so many free tutorials and cheap patterns available for children's clothes. But I finally splurged and bought one.

Of course, I was in such a hurry to get sewing that I tossed my new fabrics in the laundry as soon as I got home from the store. Imagine my shock when I changed the load from the washer to the drier and discovered that I had inadvertently washed my gorgeous new pattern. Oh the horror! Fortunately the pattern was in a plastic bag which saved it from almost certain demise. I was able to dry the pattern out. iron it, and still use it. Although it does look a little bedraggled to say the least.

The pattern was worth all the fuss! The directions and technical drawings are clear. There are good tips for sewing with knits both on standard sewing machines and sergers. And the design of the dress is really cute and kid-friendly. Those of you who dress toddlers know that they go into extreme freak-out mode if their head gets stuck in the neckline in even the slightest way. The overlapped front bodice in this design gives a lot of space for big-headed children to get in and out. I suppose the small-headed ones would be fine too.

The Sprout isn't a big fan of stiff pants or anything with much of a waistband these days ("It's tigh'!!! Hurt mah belly!!!" Sigh.). I chose to make her the longer dress version of the knit top in the cover illustration. A dress and a pair of leggings work well in our 50-degree-forever springs around here. Stick a cardigan on her in the morning and she's good to go.

Here's the first version of the Oliver + S dress I sewed for the Sprout. I made the size 2 and it fit perfectly. In fact a bit too perfectly. If I'm going to take the time and money to buy fabric and sew her clothes I want to make them a bit roomy so she can wear them for more than a few months. I also wasn't happy with the neckline and bodice. I don't know if you can tell here but I stretched the fabric too much while sewing and it still looks sort of sloppy. But overall, I'm becoming much morecomfortable sewing knit fabrics and I liked the style of this little dress enough that I went on to make version 2 (and 3 and 4)

Below is a photo of the Sprout who is currently a very uncooperative model. She is in constant motion and is not keen on the idea of posing for a photo. I think it lets you see the dress and the fit a bit though. The leggings are just some hand-me-down Carter leggings that had holes in their knees so I threw on some patches.

Come back tomorrow if you're curious about further iterations of this dress. Or if you just want to make fun of me for throwing my patterns in the laundry.

IMG_9196

14 April 2011

Meet Jane: A Brief Review of the Janome New Home 1860

IMG_8861

I've been holding out on you all. The six of you who read this blog being "you all", minus the three who are uninterested in the art/craft side of the blog since they're our family members only looking for new pictures of the Sprout. So technically "you all" refers to three people who read this blog and are wondering why Deb doesn't write about art and craft projects anymore.

So now that we're down to those of you who care, here's a little secret I've been holding out on. My very generous husband gave me a new sewing machine for Christmas! Yes, a new sewing machine! A Janome New Home 1860. The Wise and Bearded One buying me a new sewing machine is the equivalent of me buying him a new flat-panel 1080P 60HC LCD Television (I have no idea what that means but he would probably love it). He claims stepping into a fabric store gives him hives. Which means going to a sewing machine dealer and talking with a sewing machine salesman was probably a life-threatening situation for him. Which means love, true love.

A new sewing machine requires new fabric, I am sure we can all agree, so I promptly went out and bought a pile of fabrics at Fabric Depot for myself . (You do that too, right? Buy yourself your own "Christmas" presents? I hope I’m not the only one.)

IMG_8904

Here's the Fabric Depot haul (top to bottom): Scandi Chirp from Michael Miller patterned knit, moss green and mustard cotton velveteen (the moss green already became pillowcases in my bedroom), and then four beautifully soft knits from Liesl Gibson's Oliver + S line from Moda.

And then the new machine and the pile of freshly-laundered fabric sat there for January and February as we weathered a death in the family, a home improvement project and two months solid of sickness. I swear I didn’t even crack the machine out until March.

She’s a nice solid machine. She has all the basic stitches, a few fancy ones, and a decent buttonhole option. Not a lot of bells and whistles but certainly an upgrade from my skip-every-third-stitch, ball-up-bobbin-thread-underneath, make-me-swear-under-my-breath old Singer. I really like the steady, even stitching. My only complaint, and it is minor, is that I like to sew fast and I feel like Jane the Janome doesn’t quite know how to keep up with my petal-to-the-metal ways. There are three speed settings and when I'm on a nice straight seam the highest speed still feels like I'm in the slow lane.

But Jane is great and as we've been getting acquainted over the last couple of weeks we've been cranking out a few new projects. This weekend we got just enough sunshine to take a couple of photos so expect some actual sewing posts coming in the next couple of days.

06 April 2011

Quilts for Quake Survivors, Part 2

Here are a few (poor, Iphone) photos that I wanted to share from the Quilts for Quake Survivors sewing night at Cool Cottons this week. There were just six women sewing away, ironing, and laying out quilt designs. The generous ladies from Cool Cottons donated their demonstration squares from their Block of the Month patchwork classes. Linda and Denise sewed white sashing to join those together to make two gorgeous full-size quilt tops.


Denise must be a serious quilter because she brought in a bunch of pre-made squares that I got to sew together into a charming crib quilt. Another sewist brought in a half-completed kids quilt top and finished stitching it up. And there was a fifth quilt top in progress when we quit.


Four quilt tops in two hours is good progress in my book! There are additional quilting parties coming up so if you're a local sewer, please come on down. Really you only have to sew a straight line.


--------------

The hum of sewing machines running and the murmur of women chatting makes me happy. I think it's nostalgia for all the women's church sewing circles and my great-aunt's quiltings that I remember from childhood. Mostly I remember running around with my friends and cousins and then collapsing on the floor under the middle of the quilt when I was tired. I loved looking up through a quilt in frame.

Does anyone else have memories of women gathering together to craft that you experienced as a child? Do you think that influences your interests in art/craft today?

04 February 2011

Made: Custom Pillow Cases

IMG_9207

So I've been looking for some bold, graphic elements to add to the bedroom, and bed linens seemed like a good place to start. But I already had a white duvet cover and brown quilt from the last version of our bedroom, and I didn't want to spend a lot of money on bedding. So it was time for some sewing.

I had some green velveteen from a recent trip to Fabric Depot to cover our "reading" pillows. And I was hoping to find something bold, graphic/geometric, with some ochre yellow and mossy green to cover our sleeping pillows. I didn't have a lot of time to shop so I made a quick trip to my closest, favorite fabric store--Cool Cottons on Hawthorne, for you local readers. I'm constantly amazed how this little store has such a fabulous collection of fabric. Despite the fabulous collection of fabric, I didn't really find what I was looking for. But I did find this.

I fell in love with Alexander Henry Matisse "Joy of Life" fabric. It's bold. It has mossy green and ochre yellow in it. And brown. And red and grey and pink and turquoise.

I brought it home and followed a tutorial for sewing a pillowcase. The Hot Dog Pillow Case to be exact. And let's just admit that's an embarrassing name worth a few snickers. I'll wait a bit for you to quit snickering. It's a terrible name but a great way to make a pillow case.

Now the pillows are finished and on our bed and I'll have to admit, I'm not in love with them. They seem a little too busy and maybe too colorful for me. So I'm putting it out there for you all. What do you think? Thumbs up or thumbs down? Should they stay or should they go? Please comment below!

-----

This picture is a quick, low light shot from earlier this week. I'm hoping to get some good photos of the room this weekend during daylight to post. Unfortunately this morning I brought a sick little girl into bed with me and she promptly puked all over the bed linens. And so the bed linens are in the wash, the Sprout is sick and sad, and I have bigger concerns than styling a "photo shoot". If you are a pray-er, your prayer for her body to heal itself quickly would be greatly appreciated. Thanks.

01 February 2011

February Challenge #3


Oh, I've saved the best blog challenge for last! Have you heard about Colette Patterns? Sarai Mitnick runs this great vintage-inspired pattern company here in Portland. Reading her blog is an education in the history of fashion and the craft of sewing.

She's hosting a Spring Palette Challenge.

"The idea is very simple. You choose an inspiring palette for Spring, then you sew a tiny wardrobe based on that palette. You choose the color palette, the number of colors, and the pieces you sew. The palette can be based around fabrics you already have (so you can use what you have), or you can do something new. The challenge will be 10 weeks long (now through the end of March). Here’s how we’ll structure it:

  • Week One: Define your challenge. Gather inspiration, make inspiration boards, review fabric choices, pick your palette, and decide how many garments you’d like to sew from the palette.
  • Week Two: Plan your projects. Choose your patterns, sketch out your ideas, and make a plan.
  • Weeks Three through Ten: Sew! Make your mini Spring wardrobe, and share your progress with everyone else."
Doesn't that sound like fun? Unfortunately I am currently without a sewing space in my house and my family is getting tired of my stealing the dining room table all the time. Hopefully, I'll get some "studio" space back soon. Or at least one spot where I can leave a giant mess and nobody cares!

I've had fun thinking about what my color palette would be. Every day on my drive to work I think about the palette of the world around me. The soft grey fog rising up out of the Willamette River. The lush greens of the firs and pines. The soft purple-brown deciduous trees as they're just starting to bud. And little hints of chartreuse where new growth is starting to poke through. My spring palette would look a little something like this:

misty morning in the Japanese Garden
(Thanks to Little Pink Weeble for sharing this photo on Flickr)

What colors are you loving for spring? I know some of you are in the depths of winter in the Midwest, so dream a little. What do you want to wear when it starts to warm up outside?

12 December 2010

Made: Advent Calendar, Part 2

IMG_8571_edited-2

Some of my fondest childhood Christmas memories were spent re-enacting the Christmas story with a plastic nativity set that my parents own. I wanted the Sprout to have that same sort of interactive experience with the Christmas story so I made finger puppets to fill our Advent Calendar. Although you might think this is Joseph, Mary, baby Jesus and the angel Gabriel, you would be wrong. This is actually Zachariah, Elizabeth, the baby John the Baptist and the angel. I happened to know that the Sprout is obsessed with "baaee-beees" right now and I would have a better chance of catching her imagination if there was a "baaee-beee" long before Day 25 when the Christ Child arrives.

Really I don't have all 25 of the characters finished yet. I have three wise men, a couple of camels, some shepherds and sheep, a cow, and a donkey in the works. And then of course there will be Joseph, Mary and Jesus. 25 pockets seems like a lot to fill but the beauty of it is that each day only requires one more character, and if I don't manage to get that one done, the Sprout is young enough that she doesn't notice yet. I imagine next year, she will be adamant that we do the story correctly every night with a new cast member.

The finger puppets are made from materials that I had around the house since I'm not sure how committed I am to them for the long-term. I used some canvas I had left over from an earlier project and a black fabric pen to draw simple characters on it. Then I filled in a bit of the drawing with fabric paint (also left over from earlier projects). I layered the characters on to another layer of canvas and zigzagged around each one before I cut them out. I didn't finish them very neatly but I was trying to keep it simple and something I could do on the fly once a week or so.

The finger puppets are a little big for toddler fingers. I'm considering sticking velcro on the back of each character and making backdrop for them to stick to like this Little People Advent Calendar.

Like I said, I don't know that the finger puppets are what will always abide in the pockets of the calendar. When the Sprout is older I'd like to incorporate family activities in the Advent Calendar. I love how Sally Shim does it with her boys over here, and my friend Michelle is having a great time with Advent with her family over here.

I hope the Sprout remembers this part of Christmas first. The part with the anticipation of the birth of a Savior. The part with angels and stars and kings and the divine mystery of God made flesh. I hope she remembers feeling part of the story like I did when I was a child.

01 December 2010

Made: Advent Calendar

The Housemate and I decided to ignore the Black Friday craziness and instead have a Friday Crafternoon. A couple of our crafty friends came over and we all chatted and enjoyed each others company while we "made things".

I made an Advent Calendar. I've been wanting an Advent Calendar for a while and this seemed to be the year to get a tradition in place. The Sprout is old enough to get excited by little rituals but young enough that she won't remember if change things up and do it a little differently next year---working out the kinks.

In keeping with my desire for a simple, sacred Christmas, I wanted a simple, reusable calendar and I didn't want it to be filled with candy. Here's what I came up with:
IMG_8369
It's off-white felt--not the crunchy craft felt but the slightly softer stuff that has some wool in it and is on sale right now at JoAnn's. I chose felt so I did not have to finish any of the edges. I kept being tempted to add flourishes, embroidery, something, anything. But I'm glad I kept it super simple and just wrote the numbers on with a fabric pen. I got it all done in one Friday Crafternoon.

Once you have an Advent Calendar, you have to figure out what to put in the pockets. I thought about buying little treats or stickers but I settled on this:

IMG_8371
This is still a work in process so you only get a sneak peek of what's inside. The beauty of an Advent Calendar is that I only have to be ahead one day at a time. It's sort of a perfect project for someone like me who procrastinates until I have a deadline.

Do you want to see more?

---------------

If you're thinking about creating an Advent Calendar, there are ideas all over the craft blogs in the last couple of days. I particularly liked Blair's post over on Wise Craft that included links to some other great Advent Calendars like this one at the Purl Bee.

20 November 2010

Made: Toddler Backpack

I finally finished the on-line graduate class I've been toiling away at, and so I've been able to have a little fun the last week or so. First up was making this sweet little backpack for the Sprout. I found Indietute's Toddler Backpack Tutorial and worked off of it. I added a freeze paper stencil of her first initial and some apple printed fabric to line part of it. I thought it turned out pretty cute and I've been thrilled that she wants to wear her "pack pack" every day when we leave to go to the sitter's house.


Please pardon the poor quality of these photos. I have only a few minutes of twilight by the time I get home from work in the afternoons. I shot these with my Iphone in low light. Blasted daylight savings time!

05 August 2010

Japanese Sewing Class, Part 3

IMG_7563

Now for the technical sew-y part about this dress: Despite the fact that I added 4 inches to this dress over the largest Japanese size and did the most ridiculously tiny rolled hem, this dress is only JUST long enough to wear by itself. My husband thinks it looks great (as he should :) but I intend to wear it with leggings or tights and boots and layer a cardigan or jacket over it this fall.

When I added the length, I initially just added it to the skirt but, as you can see there is a back bodice piece and then the skirt is attached. When I stitched the skirt to the bodice it was hilariously high. I appeared to have a skirt coming out of my bra line! It wasn't so hilarious when I had to rip it all out and recut a longer bodice (by two inches). I also ended up extending the front pleats (or are they darts?) by two inches and moving the bust dart down two inches. Doggone tiny tiny tiny Japanese women!

I was a little fearful that this full tunic would have the dread pregnant effect. It is pretty loose but overall I am pleased with how it turned out and I feel comfortable wearing it. I even wore it out on a (rare) date with the Wise and Bearded One the other night. He obligingly took these photos.

Japanese Sewing Class, Part 2


IMG_7562_edited-1
Here it is! Stylish Dress Book (#1) Dress E which is the same dress on the front cover. I learned a lot about sewing from Japanese sewing books with this dress.

First of all, why didn't I hear about using Swedish Tracing Paper before? This stuff is amazing! It's sort of halfway between tissue paper and a thin interfacing fabric. You can see through it enough to trace off a pattern. It cuts up nicely and is more sturdy than tissue paper. In fact, I've been told you can even baste pieces together if you're not sure whether the pattern will fit correctly.

Secondly, I learned how to add seam allowances to the Japanese patterns and how to determine sizing.

And that brings me to the third fact I learned: Japanese women are tiny, tiny, tiny. I'll admit that a bit of swearing occurred when trying to figure out how to make the largest Japanese size (probably a US size 8 or 10) fit me (size 12/14). Fortunately most of the Stylish Dress Books are meant to have ample ease so an exact fit isn't necessary.

Apparently Blogger and my laptop are fighting a death duel this week so I am attempting to post from Flickr instead. My apologies if this looks a little goofy. I mean, I know the PICTURE looks a little goofy--that's me trying to pose and I don't like that side of a camera lens very well--but the actual post might look a little goofy too.

30 July 2010

Japanese Sewing Class: Love!

IMG_7414
I am in love with Modern Domestic! I took my first class there over the past three weeks--a class on sewing with Japanese pattern books--and it was fabulous. For those non-Portlanders, Modern Domestic is sewing studio/workroom with really great sewing machines, sergers, irons, etc. for your use. It's always fun to meet other people who share your interests, especially relatively arcane ones like an interest in Japanese sewing books. The class was relaxed and friendly but there was a certain amount of intensity as everyone worked to draft their patterns, cut, stitch and steam while still trying to find a bit of time to chat.

IMG_7419_edited-1

I loved this tunic dress that Daniela had in the window as a sample, so I made a very similar one but I don't have any good pictures of me in it yet. The Wise and Bearded One is working late these days on a deadline so I'll try to get him to take one of me over the weekend.

It's late and I know I won't be able to write articulately so I'm just going to post some photos here for now.

IMG_7413
IMG_7412
IMG_7415
IMG_7417
IMG_7418_edited-1>
IMG_7421
Of course, a little saki helps ease the Japanese sewing along....

Followers