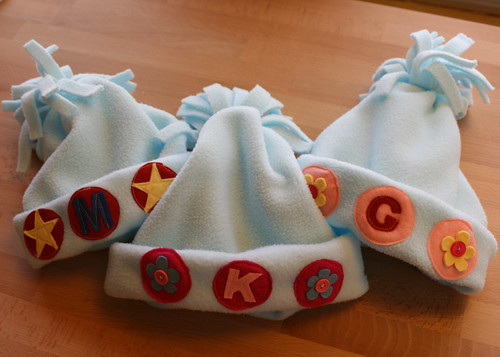
17 January 2012
Felt Flower Pin Tutorial
I love an instant gratification craft, and I love a glue gun so this is the perfect little craft for me. I made oodles of these and used them to jazz up my Christmas gift wrappings. This is my first attempt at making a photo tutorial so please excuse the wonky bits. Without further ado....
theme and variations:
--glue to barrette back instead of pin back
--glue several to one piece of felt to make a larger multi-flower pin or a bib necklace
--vary the size by cutting wider pedals and/or using larger strips of felt
19 November 2009
Tutorial: Living Water International Christmas Tree Ornament

(I also happen to be privately amused by hanging raindrops on a Christmas tree since it seems more accurate here in the Pacific Northwest than pretty snowflakes)
YOU NEED:
-a pen
-sharp scissors
-a needle
-felt and embroidery floss
-pattern ( I drew mine by hand as seen in the bottom photo. You can make your own raindrop shapes by folding a paper in half and cutting out a shape. Folding the paper in half helps to develop an exactly symmetrical water drop shape. Adjust until you have a shape that you are satisfied with. My large raindrops were approximately 3 1/2 inches wide by 5 inches tall. My small water drops were about one inch smaller all around.)
DIRECTIONS:
1. Cut out pattern pieces.
2. With a pen, trace the water drop shapes onto the felt. Cut two felt water drops from each size. To avoid having the ink marks show, cut just inside of the ink line you traced.
3. Carefully split the embroidery floss in half. It is much easier to sew with 3 strands than with 6.
4. Center one small water drop on the larger drop. Stitch around the edge of the smaller drop to attach it to the larger drop. Repeat with the second set of water drops.
6. Stack the water drops together with the decorated sides out. Stitch around the edges through both pieces of felt. Be careful to tuck all knots and thread ends between the two pieces of felt.
7. Tie a loop at the top of the water drop so an ornament hanger can be attached.
8. Go to https://www.water.cc/ to make a donation to Living Water International.
9. Give this ornament to a friend or family member with a card explaining the mission of Living Water International and how, in lieu of a traditional Christmas gift, you’ve chosen to provide clean water and the gospel to those in need.
Tip: I embroidered my raindrop with pale green and pale gold embroidery floss. However, I think they would be stunning with bright blue or turquoise stitches.18 November 2009
Tutorial: Felt Cuppa Joe Pins

Comment on this post and you could win one of three kits with all you need to make 2 Cuppa Joe Pins this Christmas season. Just write a comment about your favorite warm winter beverage! I'll pick three random comments on Sunday. That is, if there ARE more than three comments! Is anyone out there? Anyone? (Bueller?)
I'll post the directions for the "losers" in the vain belief that there are more than three readers out there who might want to make some pins themselves.
FELT CUPPA JOE PINS
-a pen, sharp scissors, a needle
-scraps of red (or blue), brown, and white felt and embroidery floss
-pattern (I hand drew mine so I don't have a "digital" version. You can try printing the photo or you can draw your own if you'd like. It's about 2 inches across at its widest point.)
-pin backs (you can buy these in the jewelry section at your JoAnn's, Michael's or other craft stores)
DIRECTIONS:
1. Cut out the pattern pieces.
2. With a pen, trace the mug pattern on to the red (or blue) felt and cut two. Carefully cut out hole in the mug handle.
4. Carefully split the embroidery floss in half. It is much easier to sew with 3 strands than with 6.
5. Sew the coffee shape to the front of one mug shape. Embellish the front with any additional stitching or felt marshmallows.
6. Sew the pin back to the back of the second mug shape.
7. Stack the front mug on top of the back mug. Stitch around the edges through both pieces of felt. Be careful to tuck all knots and thread ends between the two pieces of felt.
8. Give it away.
***Relational Giving Ideas:
Give a pin to a friend with an invitation to meet up at her favorite coffee shop for a long conversation.
Know a busy mom? Give her a pin with a gift certificate to her favorite coffee shop and an offer to babysit so she can take a mini-vacation.
P.S. Please excuse the crappy quality of these pictures. The dark winter evenings are the bain of my existence here in Portland, Oregon. I hate "flashy" photos so I just set the camera settings to compensate for the low light as best as possible. Someday I'll have one of those fancy flashes that I can point up at the ceiling to get some nice diffuse lighting. Someday.
17 November 2009
Tutorial: Felt Flower Barrettes

- a pen, sharp scissors, a needle, red and pink felt, and embroidery floss
- barrettes--the silver clip kind that are sort of long triangles like these
- pattern (I hand drew mine. You can try printing it from the picture. It is about 1 1/2 inches wide--just wide enough for the barrette to fit securely between two flower petals with about 1/8th inch extra on each end. The center circle is about the size of a dime.)
DIRECTIONS:
1. Cut out pattern pieces.
2. With a pen, trace the flower pattern on to the red felt and cut two.
3. Trace the circle on to the pink felt and cut one.
4. Carefully split the embroidery floss in half. It is much easier to sew with 3 strands than with 6.
5. Sew the pink center to the front of one red flower shape. Decorate the front with any additional “fancy” stitching desired.

7. Stitch around the edges through both pieces of felt. Be careful to tuck all knots and thread ends between the two pieces of felt.
8. Give it away.
***Relational Giving Idea:
Give a barrette to your favorite little girl with an offer to get dressed up and go dancing with her (in your living room to her favorite songs).

05 May 2009
Made: Lazy Days Skirts

I have some fabric that has been sitting on my work table for almost a year now. Some fat quarters of "girly" fabrics that I meant to make into some summery clothes for my nieces LAST spring and then I got pregnant and tired and unmotivated. So..... I need to clean my work table and rather than fold the fabric neatly and reshelve it, I made some skirts for the girls.
This is the free Lazy Days skirt pattern from Liesl at Oliver + S. It is super easy with the ribbon doing all the hem work at the bottom of the skirt. I think each skirt took about 30 minutes total. I do most of my creative work between 9:00 and 11:00 at night and baby is sleeping those hours these days so I'm managing to wedge in a few projects between loads of laundry, dishes, catching up on email and facebook, etc.
26 February 2009
Work in Progress: Crib Quilt

Remember these inspiration quilts? Remember this fabric? No? That's ok. I posted them a long time ago. Anyhow, I thought you'd like to see that I haven't totally forgotten about them. I have slowly been sewing a wanky log cabin square every so often. I'm in no hurries. The Sprout has a few swaddle blankets and won't need the crib or the crib quilt for a long time. Just thought you might like to see what's going on in the studio.
P.S. Thanks to Tallgrass Prairie Studio for the tutorial!
22 February 2009
Work in Progress: Baby Burp Clothes


Ok, so I know cute burp clothes are not a necessity for a baby, but since she's not coming early and I've got the time, I decided to make a few so we can wipe up her puke in style. I think they would also make a great baby gift.
There are lots of tutorials on line so I'll link to my favorites:
--Homemade by Jill's Burp Cloth Tutorial makes shaped burp clothes out of flannel. I think this is the pattern that my niece Sharayah used.
--Make and Take's Burp Cloth uses a pre-fold diaper, pretty ribbon and hem tape. I made six of these but then I ran out of cute ribbon. These are very cute and maintain the largest surface area of absorbent "diaper". I used the pre-packaged polyester hem tape though and I hate how stiff and fake-feeling it is. I'll have to see how it holds up to multiple washings.
--Chickpea Sewing Studio also uses a pre-fold diaper and pretty fabric. Once I ran out of cutesy ribbon, I made half a dozen of these with scraps from the crib quilt that I'm making (hmm...I suppose I should post some pictures of that at some point).
So now we're ready to sop up baby puke in style.
09 February 2009
Links for the Week
But here are some links that I don't want to lose:
--Sewing and Crafting Tutorial Links from The Long Thread This might be a good place for my sister who just got a sewing machine to find some not-too-difficult projects.
--The design blogs have been mourning the demise of Domino Magazine, but the Deco File website is still up for a little longer for those of us who need design inspiration.
--The Black Apple has adorable free printable Valentines for the ones you love. I encourage you to send at least one Valentine to someone who otherwise wouldn't get one (i.e. your single friend, your grandma, the elderly neighbor).
--Two recipes that sound good to me: Savory Roasted Kale and Fabulous Homemade Bread that my kindred spirit, Amy, is all excited about.
22 December 2008
Tutorial: Last-Minute Fleece Hat
Here's a fleece hat that can be made in 15 minutes. Really! So if you are
1. Cut a piece of fleece into a rectangle 16 inches high by 20 inches wide (shown in photo folded in half along left side). I was making my hat for a small child, and I wanted a final circumference of about 19 inches so a 20-inch width left room for a 1/2-inch seam allowance. You want to make sure that the circumference (i.e. bottom dimension in this picture) is aligned with the stretchy side of the fleece. You can use this guide from Martha Stewart to determine the width.
Average Head Circumference:
Newborn (6 months and younger) 14 to 17 inches
Infant (6 to 12 months) 16 to 19 inches
Child (12 months to 3 years) 18 to 20 inches
Child (3 years and older) 20 to 22 inches
Adult Woman 21 to 23 1/2 inches
2. Along the top edge, cut a fringe about 3 inches long. I just used the length of my scissors and snipped in about every 1/2 inch all along the top. Along the right (cut) edge, measure up 5 inches from the bottom and make a 1/2 snip.3. Sew the 1/2 inch seam from the bottom of the fringe all the way down to the snip you made in the side. You can be a sloppy sewist because fleece is incredibly forgiving and your stitches are going to disappear down into the seams.
4. Turn the hat right-side out (it was inside-out when we started) and sew from
5. Take a scrap of fleece about 8-10 inches long by 1/2 inch and tie it around the hat just under the fringe. Make a nice tight knot, and then cut off the "tails" of the tie so that they are the same length of the rest of the fringe.
You're done. Seriously. 15 minutes or less.
Of course, if you're me, you now spend an hour or more embellishing each hat with personalized felt initials and flowers and stars. I find it helpful to
I'm pleased with the end results, and I'd definitely make similar hats again. I think they'd make a great birthday present for a winter birthday. In a solid grey, black or brown I even think a grown man would wear them....maybe with a shorter fringe on top. I'd love to recycle worn fleece jackets into hats. And we certainly have plenty of fleece jackets here in the Pacific Northwest.

10 November 2007
Simple Gifts to Sew OR How I Learned to Sew from the Internet
--Bittie Booties
--Iron-On Appliqued Onesies
--simple stuffed animals: Here’s a tutorial for a “snoogum”
--washcloth
For Kids & Teens:
--Freezer Paper transfers on t-shirts. You don’t even have to sew to make this one and they turn out awesome.
--Headbands for the girls.
For Adults:
--A little green? Cloth napkins are reuseable and easy to make (you can even make them out of thrifted fabric or organic cotton or hemp): Cut 17 inch squares; fold under and press ¼ inch hems around the edges; do this a second time so the hem is turned under twice; topstitch all around the edge.
--Feed your friend’s inner geek with a Fibonacci scarf
--Feeling quite adventurous?Try making a log cabin pillow.
06 July 2006
Inspiration Point

There's another Bee's Nest out there on the web and she is fabulously creative with fabric. I love this little baby kimono. Bee's Nest has the pant's pattern on her site and the kimono pattern comes from Martha. How cute! I have other projects in line to do first this summer....Could I make an outfit for Glory before she'd be out of newborn size?